FUEL-19, Fuel Pump Suction Strainer - Removing, Cleaning, and Replacing
Acrobat Printable Version
Introduction
If you have a problem which involves a low fuel system pressure or inadequate fuel pump capacity it may be due to a clogged fuel filter or fuel tank strainer. Now, most people realize that there is a fuel filter on the discharge side of the fuel pump. However, most people are unaware that there is also a strainer on the suction side of the pump. The strainer is part of the fuel tank outlet line and requires draining the fuel tank to clean or replace the strainer.
So, is you have a low fuel system pressure as measured at the fuel rail or are experiencing a low fuel pump capacity, before you replace the pump, first try replacing the fuel filter. Next, try cleaning the fuel pump suction strainer. Then, if neither of those fixes the problem, it's time to consider replacing the fuel pump.
Also, I've seen instances where leaks at the fuel tank resulted from a failed seal for the fuel pump suction strainer. If you have a leak in the location of the strainer, drain the fuel tank, remove the strainer, and replace the seal using the appropriate steps of this procedure.
Tools
Floor Jack
Jack Stands
Enough containers to empty the fuel tank
17 mm deep socket and ratchet or 17 mm wrench
Catch Rags
Parts
Part Number
Description
Model
Year
928 201 081 04
Screen (Pump Suction Strainer)
944, 944S, 944S2, 944 Turbo
All
928 201 187 02
Strainer O-Ring Seal
944, 944S, 944S2, 944 Turbo
All
Procedure
First, check the fuel level on the gauge to determine approximately how much fuel is in the tank. If your fuel level gauge is not working or you have reason to believe it is inaccurate, assume that the tank is full and have enough contains on hand to drain approximately 20 gallons of fuel from the tank.
Disconnect the battery negative lead.
Raise the rear of the vehicle using a floor jack. For safety, it's best to place the rear of the vehicle on jack stands once you have it raised.
If the vehicle is equipped with a cover for the fuel pump (at the bottom of the fuel tank) remove the fuel pump cover. The cover will have a strap holding it to the bottom of the fuel tank and a single bolt (13 mm head) near the wheel well.
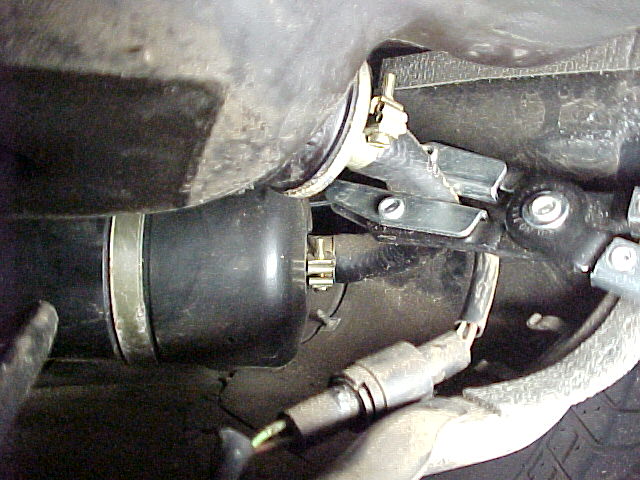
Locate the fuel line going from the bottom of the fuel tank to the suction of the fuel pump and pinch the rubber fuel line using a hose clamp (as shown below).
Using a flat tip screwdriver, loosen the hose clamp at the fuel pump suction and disconnect the hose from the pump. Be ready with a container to catch any fuel which will drain from the fuel line and fuel pump. Also, have some catch rags on hand to clean up any fuel that might spill from the lines.
Place a container under the fuel line and loosen the hose clamp to start draining the fuel from the tank. When the container is full, pinch the line once again with the hose clamp to stop the flow of fuel until you can replace the full container with an empty container. Repeat this process until all of the fuel is drained from the tank. If you use containers which are clean to begin with and keep them clean by covering the container when it's full of fuel, you'll be able to reuse the fuel when the job is complete.
Once the tank is completely drained, using a flat tip screwdriver, loosen the hose clamp and the fuel tank outlet and remove the hose from the tank outlet nozzle.
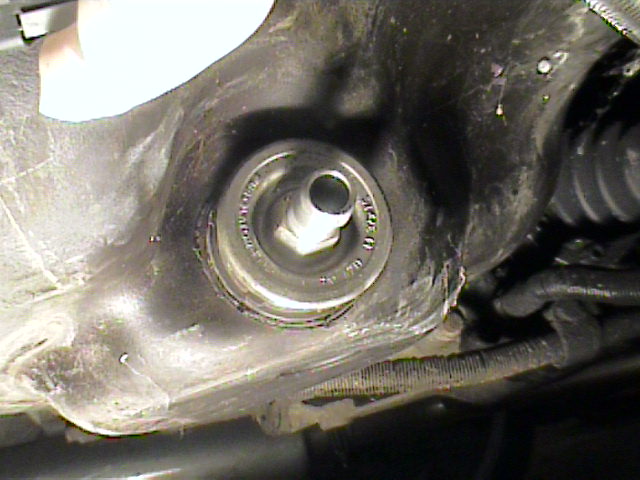
You'll notice that the tank outlet is a larger round cover with a nozzle coming out of it. At the base of the nozzle (which you can't see too well with the hose attached), there is a hex head that's part of the nozzle.
Using a 17 mm deep socket and ratchet or 17 mm wrench on the hex of the nozzle, turn counter-clockwise to remove the nozzle and strainer assembly. Make sure you have a container underneath the tank. The bottom of the strainer assembly is below the level of the nozzle so, some additional fuel (a small amount) will drain from the tank when the strainer is removed.
When you get the strainer out, inspect the strainer for debris built up on the outside of the screen. You can see from the picture below that this particular strainer is very clean. You may find some debris at the base of the strainer (second picture below) which may be cleaned out using a small probe. However, be careful not to poke a hole in the strainer while you're cleaning that area.
You may clean the strainer if it is clogged by backflushing fuel or carburetor and choke cleaner back through the nozzle. You may also blow low pressure (10 psig max) air back through the strainer nozzle to loosen debris from the screen. If you discover any holes in the screen during cleaning, the strainer should be replaced.
Install a new O-ring seal on the strainer. Coat the seal with a small amount of moly grease to lubricate the seal. This will keep it from binding and getting cut or abraded during installation.
Install strainer and tighten using 17mm wrench or deep socket.
Attach the fuel line to the strainer nozzle and fuel pump and tighten hose clamps.
Refill the fuel tank and check the strainer assembly and fuel lines for leaks.