Using AF-01, remove the air filter housing and air flow sensor.
Remove the alternator and power steering belts.
Remove the front timing covers.
Using IGN-01, remove the distributor cap and rotor.
Remove the front distributor housing cover.
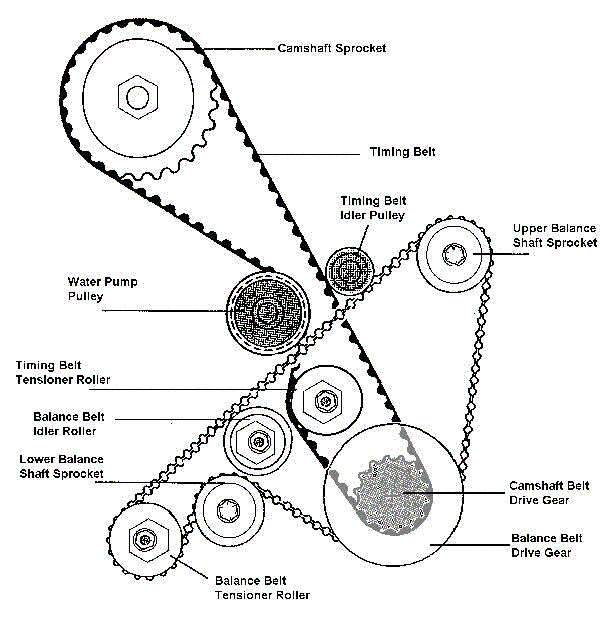
On cars not equipped with spring tensioners (pre-'87), perform the following:
Loosen the camshaft tensioning roller lock nut and turn the camshaft tensioning roller nut beneath it in the clockwise direction to release the tension on the timing belt. Hold the flats on the tensioner roller with an open end wrench while loosening the locknut to provide counter-torque. Failure to provide counter-torque while loosening (or tightening) the locknut causes stress on the tensioner roller stud which can lead to long-term failure.
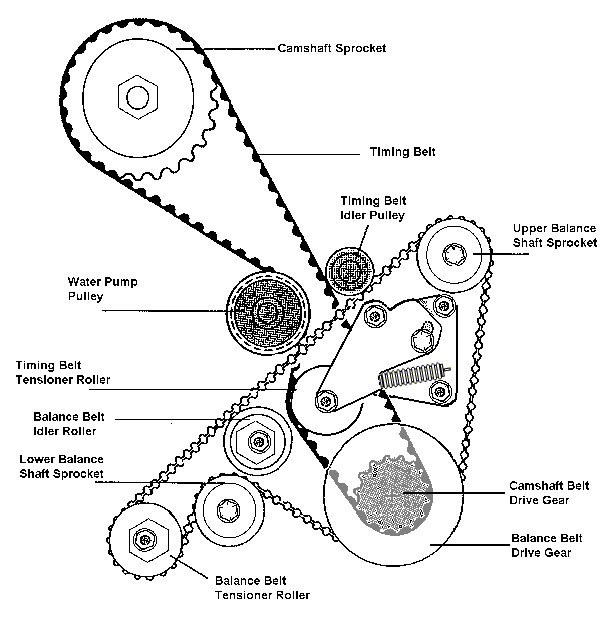
On cars equipped with spring tensioners (87 Model Onward), perform the following:
The front plate of the spring tensioner resembles a triangle. Loosen, but do not remove, the locknut and bolt on the side of the triangle near the tensioning spring.
Remove the tension on the belt by pushing down on the tensioner lever arm. This can also be done using the factory balance shaft spanner if you have one. With the spring still compressed, tighten the locking bolt and nut.
With the timing belt detensioned, slide the timing belt off the camshaft sprocket.
Figure 1.
Figure 2.
NOTE
Use the cam housing exploded drawing above and the component reference numbers in the preceding steps to determine the location of various components.
The camshaft sprocket is held in place by a retaining collar (Figure 1, 18). Mounted in a recess in the end of the retaining collar, there is a connector to which the ignition rotor is mounted (Figure 2, 26). After removing the rotor and the front distributor housing, remove the bolt (10 mm socket or wrench) which holds the connector in the collar and remove the connector by pulling straight out of the collar. It can be difficult to remove and may require heating the outside of the recess in the camshaft to loosen.
Behind the connector, you will find an M10 x 65 mm bolt in a recess in the retaining collar (Figure 1, 19). This bolt holds the retaining collar and camshaft sprocket to the end of the camshaft. On some cars this may be a hex (Allen) head bolt or a cheesehead (12 point internal). If the car is equipped with a hex head bolt, Porsche calls for the bolt to be replaced with a cheesehead bolt. Since the torque spec for the cheesehead bolt is significantly higher than the hex head bolt, I suspect that there have been problems in the past with these bolts backing out and that Porsche went to the cheesehead bolt to allow a higher torque value. However, that's merely conjecture on my part.
Using a 10 mm cheesehead tool or hex tool, remove the retaining collar bolt. Before attempting to remove the cheesehead bolt, make sure you "wake up" the bolt by inserting the cheesehead tool into the bolt head and tapping the tool with a hammer several times.
CAUTION
DO NOT ALLOW THE CAMSHAFT SPROCKET TO TURN MORE THAN A FEW DEGREES while loosening the cheesehead bolt. If so, the valves will contact the pistons and possibly cause damage.
You will have to hold the flats on the camshaft sprocket retaining collar (1-1/4") with an open end or combination wrench while turning the cheesehead bolt. This is somewhat awkward. Because of the lip on the rear distributor housing you can not get the open end of a combination wrench onto the flats of the collar straight on. However, you can get the wrench on the flats at a slight angle and still remove the cheesehead bolt. I've found that using the closed end of a combination wrench, because the head is at an angle, works better. Cheesehead bolts tend to strip very easily. It's important to hold the tool straight and fully inserted into the bolt while loosening. Therefore, a second person to hold the wrench on the flats of the collar while you remove the cheesehead bolt is almost a necessity.
Once the cheesehead bolt is removed, the retaining collar and camshaft sprocket will slide straight off the end of the camshaft. Do not try to turn the sprocket or retaining collar while removing. They are positioned on the camshaft by a woodruff key. So, turning the camshaft or retaining collar will also turn the camshaft.
Remove the woodruff key from the slot in the camshaft. I've found that a pair of diagonal cutters or needle nose pliers works well for removing the key.
Remove the bolts (3) which hold the rear distributor housing to the camshaft housing.
Slide the rear distributor housing off the camshaft.
In the back of the rear distributor housing, you'll find a spacer (Figure 1, 20). More than likely the spacer will come out with the rear distributor housing as it is held by the main camshaft seal. If so, you'll see a thin mylar (plastic) seal (Figure 1, 23) on the end of the camshaft that you need to replace. If the spacer did not come out with the rear distributor housing simply slide it off of the camshaft and replace the seal.
There are three seals on the rear distributor housing which must be replaced. The main shaft seal (Figure 1, 22) goes into the front of the housing. There is also a large o-ring (Figure 1, 21) and smaller round seal (Figure 1, 13 - See NOTE below) which go in the back of the housing to seal between the distributor and camshaft housings. Apply a small amount of engine oil or bearing grease to the seals prior to and after installation.
NOTE
Figure 1 shows the small round seal (13) being installed at the front of the cam housing. That is somewhat misleading. The seal does mate to the front of the cam housing but, for mounting purposes, it gets installed in the back of the rear distributor housing cover. The picture below shows where this seal is mounted.
Install the new seals on the distributor housing and slide the housing onto the end of the camshaft.
Install the distributor housing (M6) retaining bolts and torque to 8 Nm (6 ft-lb).
Insert the woodruff key into the slot in the camshaft and install the camshaft sprocket and retaining collar.
Install the M10 x 65 mm bolt into the retaining collar. For cheesehead bolts torque to 65 - 70 Nm (48 - 52 ft-lb). If you decide to use a hex head bolt, torque to 45 Nm (33 ft-lb).
Install the connector into the recess in the retaining collar.
Apply loctite to connector retaining bolt (M5 x 10 mm), insert into collar and tighten.
Verify the crankshaft has remained at TDC (ENG-13) .
Align camshaft sprocket to TDC using the scribe mark on the camshaft sprocket and mark on the rear distributor housing.
Install the camshaft belt onto the camshaft sprocket. Ensure there is no slack in the portion of the belt going directly from the camshaft sprocket to the gear on the crankshaft.
Install the air flow sensor and air filter housing (AF-01).
Reconnect the battery.
Rear Cam Housing Gasket Replacement
The rear cam housing gasket is not very difficult or time consuming to replace. However, the bolts that hold the rear cover in place can be a bit difficult to get to. I'm not sure why but, Porsche used a cork gasket on the rear cam housing cover. They are notorious for leaking and usually start giving problems shortly after the car has 50,000 miles on it.
The rear engine lifting ring is attached to the rear cam housing cover. If the car is equipped with a TDC sensor there will be an electrical connector attached to the rear engine lifting ring. If so, remove the 10 mm bolt that hold the electrical connector retaining strap to the lifting ring and move the connector out of the way.
There are three bolts (M6) which hold the lifting ring and rear cover to the cam housing. Using a 10 mm socket or wrench, remove the bolts.
Apply a thin coat of bearing grease to both sides of the new gasket (Figure 1, 9).
Position the gasket onto the rear cam housing cover and install the cover and lifting ring onto cam housing using the three M6 x 22 mm retaining bolts.


