BODY-08, Clock and Temperature Controls Removal and Replacement
Acrobat Printable Version
Introduction
This is a procedure which I've had requests for many times in the past. I've simply put off writing this procedure for some time. If you need to replace your clock, cigarette lighter, temperature control unit, or light bulb for the clock or cigarette lighter, this is the procedure you need to use.
Tools
Stubby Phillips head screwdriver
Regular Phillips head screwdriver (optional - may use stubby Phillips for all)
Small flat tip screwdriver
Small set of needle-nose pliers
Temperature Controls Removal
Remove the control knobs (4) for the temperature control unit.
NOTE
Be extremely careful when removing the fan speed control knob. It has a light bulb behind it and it is very easy to break the bulb or the retaining tabs for the stem of the control knob. It may be necessary to slide a small flat tip screwdriver behind the control knob and apply pressure gently while pulling the control knob off the stem.
Remove the temperature controls cover by carefully sliding a small flat tip screwdriver under each outside edge to loosen the trim piece.
Behind the temperature control unit cover you will find four (4) Phillips head screws which hold the unit in place. Remove the screws to slide the control unit out.
You'll find an electrical connector plug on the back of the temperature control unit. Disconnect the plug and the TCU should slide right out of the dash.
Clock/Cigarette Lighter Removal
To remove the clock or cigarette lighter or to replace the light bulb for the clock or cigarette lighter, the temperature control unit must be removed up to the point of removing the four Phillips head screws which hold the unit in place. Use the procedure above to loosen the control unit from the dash.
Open the passenger's side door (left-hand drive cars) , locate the side trim panel and remove the single Phillips head screw using a stubby Phillips head screwdriver. You will have to slide the panel toward the front of the car slightly to disengage the tabs on the trim piece from the side of the vent.
Behind the side trim panel, you will find three (3) Phillips head screws. Remove the bottom screw which holds the trim panel in place.
Carefully remove the rectangular trim cover next to the passenger side vent control lever using a small flat tip screwdriver.
Behind the trim cover you will find two (2) Phillips head screws which must be removed.
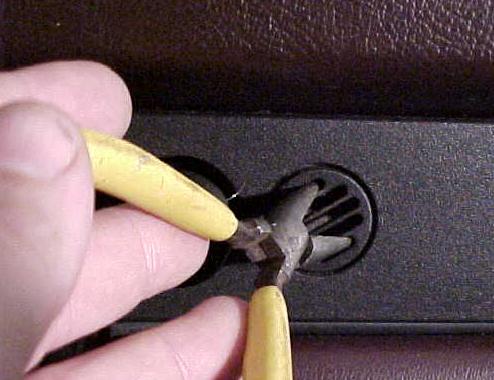
Remove the temperature sensor intake cover by turning the cover 90° counter-clockwise. I used a small set off needle-nose pliers. However, very careful as it's easy to break the vents on the cover.
Remove the single Phillips head screw behind the temperature sensor vent cover.
NOTE
Be careful when you pull on the trim piece for removal. It may be stuck and you'll need to determine why and take appropriate action to keep from breaking the trim piece.
Pull out on the right side of the trim piece. Be aware that the trim piece will likely be stuck on the right side vent slider. You'll have to carefully push the head of the slider through the slots on the vent piece to keep from breaking the slots or the slider. Also, the trim piece may be stuck the the upholstery underneath. If it seems to be stuck, slide a putty knife behind the trim piece and pry gently all the way around the edge to loosen it from the upholstery. The left edge of the clock trim panel should now slide out from behind the temperature control unit.
Installation
Position the clock trim panel (if removed) in place with the left edge behind the temperature control unit.
Install the temperature control unit retaining screws (4 Phillips head).
Install the temperature control unit cover. Press gently on the outside edges of the cover to engage the retaining clips.
Install the temperature control unit control knobs. Be careful when installing the fan speed control knob as it is easy to break the retaining tabs on the stem (which also contains a light bulb).
Install the single Phillips head screw in the temperature sensor intake opening and install the round vent cover (insert cover carefully and rotate 90° clockwise).
Install the two Phillips head screws beside the passenger's vent control lever and install rectangular trim cover.
Install the Phillips head screw in the outside edge of the front trim piece.
Install the outside trim cover using a single Phillip's head screw.