Idle Control Motor (Idle Stabilizer) Replacement

By Terry and Donald Burnett

Tools

Other Procedures Needed

Introduction

  1. 1985.5 and later 944's and all 944 Turbos use a DME-controlled, electrically operated bypass valve referred to as the idle controller to regulate idle speed. Early 944's and 944S/S2's used differing idle control systems. This procedure applies only to 1985.5+ 944's and 944 Turbos.

  2. As the name suggests, the idle controller regulates the idle speed of the motor at times when the engine is cold or has air conditioning and alternator loads placed on it. It does this by allowing metered air into the intake manifold to speed up the idle. Sometimes it may hunt slightly when it kicks in. It is controlled by the engine computer (DME) when the Throttle Position Switch (TPS) indicates that the throttle valve is in the idle (closed) position. Idle speed regulation problems may therefore also be caused by: vacuum leaks; a missing or improperly adjusted idle speed set-screw on the throttle body; a sticking throttle plate, or; a defective or improperly-adjusted TPS.

  3. When the idle controller is defective, the idle speed may fall when the engine is cold or under load at idle, causing slow idle speeds or stalling. It may also develop an air leak and allow unmetered air into the manifold, causing an erratic idle and a sucking sound. An old time way of finding vacuum leaks is to carefully spray starting fluid where the leak is suspected. The RPM's will momentarily pick up as the Ether is sucked in and burnt. Be warned that starting fluid (Ether) is very flammable and can be explosive, so use with care. Sometimes the wiring can be broken or shorted near the plug at the back of the idle controller, or the plug has fallen off. Check it carefully when diagnosing the problem.

  4. The author is basing this article on the replacement in a 1987 951. Other years may vary slightly, but over all they will be similar. In this car the Timing Valve and the Vacuum Manifold have been removed and a manual boost controller has been installed. As a result the pictures will look different from a stock engine, but the procedure will be the same.

  5. These cars are getting old and as a result many rubber products will be starting to fail. With the intake manifold off, many formally inaccessible parts will now be easy to see and replace. This is the time to carefully inspect all hoses and other buried parts and to replace them in a timely manner rather than to ignore them hoping for the best. It is not unusual for an owner to make a decision to replace all the hoses, both water and other, rather than have them start to fail piecemeal. Carefully inspection, while the intake manifold is off will help stave off unexpected piece meal repairs later. As the block will be exposed, you may find those missing nuts and bolts from before. Take some time to clean this area also.

  6. With parts in hand this procedure can be done in two hours. Plan on replacing the rubber mounts (2) as these are usually broken. Some people have replaced the idle controller without removing the intake manifold by shearing off the rubber mounts and sliding the controller out. The new controller would just float, held in place by the rubber hoses. This way can be a challenge as many things can get in the way and clamps may not be accessible.

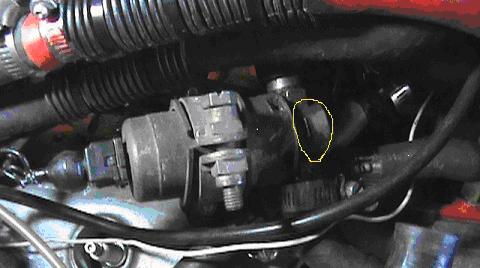
Idle Controller Replacement

  1. With the intake manifold off, loosen the 13mm bolt clamping the idle controller to the mount.

  2. Loosen and remove the hose from the intake boot at the (Left Side Hose) controller.

  3. Unplug the electrical connector.

  4. Remove the controller by sliding out of its bracket with the other hose still attached.

    NOTE

    If the rubber mounts are broken, the controller and the bracket will come out as one. Remove the bottom section of the broken rubber mounting bolts from the block and install the new ones. Remove the broken rubber mounting bolts from the mounting bracket.

  5. Carefully mark the attached hose in such a way that when you install it, it is easy to put it on in the same orientation. Install this hose on the new controller. Take note of the arrow marking flow direction and be sure not to reverse the controller.

  6. Install the controller into the bracket while putting the second hose back on. Tighten hose clamps and tighten controller bracket bolt. If replacing rubber mounts, place controller bracket onto the rubber mounts and tighten nuts.

  7. Attach electrical connector.

  8. Install intake manifold (FUEL-09).

  9. Install fuel rail (FUEL-02).

  10. Connect battery and start. Check for leaks.

  11. Idle speed should be constant, even while cold, and should be: 900 +/- 50 rpm (944 US/Canada/Japan); 800 +/- 50 rpm (944 ROW); 840 +/- 40 rpm (944 Turbo All). Adjust if needed. (Fuel 08)