FUEL-05, DME Relay Technical Information and Testing
Acrobat Printable Version
Introduction and Technical Information
The DME relay which is used on 1985.5 and newer 944s is essentially the same as the fuel pump relay used on early 944s. The fuel pump relay on the early cars is located on the fuse / relay panel under the dash on the driver's side (LHD). The DME relay actually has two relays / contacts. The primary relay and contact provide power to the DME (and on turbocharged cars the KLR) control unit. It also provides power to actuate the secondary relay. The secondary relay provides power to the fuel pump (and heater for the O2 sensor). If either relay / contact fails, the car will not start. The DME relays are prone to failure over time. This is primarily due to broken solder joints inside the relay. Often, the relay can be repaired by resoldering the broken solder joint without having to replace the relay. Another cause of failures is a diode in the flow path for the primary relay. The diode is replaceable and can be obtained at most electronic parts supply stores (i.e. Radio Shack).
Symptoms of a failing DME relay may appear in several ways. Early on, the car may not start or be difficult to start when the engine has been shut down and restart is attempted while the engine is still warm (actually while the DME relay is still warm). When this happens, the car will normally restart when it is allowed to sit and cool for a period of time (usually from 30 minutes up to 2 hours). Another possible failure mode is for the car to suddenly die while driving down the road. Again, the car will often restart after it is allowed to cool.
If your car will not start and you suspect the DME relay may be bad, try tapping on the DME relay and then attempt to restart the car. You might also have an assistant tap on the relay while you attempt to start the car. This will often temporarily fix the DME relay to get the car started.
If you experience a DME relay failure and you can not immediately get a new relay, you can get the car home by removing the relay and jumpering the relay terminals on the relay / fuse panel to supply power to the DME and fuel pump. DO NOT leave the jumpers installed when the car is not running. This will cause the DME computer to be continuously energized and the fuel pump to run continuously which will drain the battery. Jumper fabrication and installation will be covered later in this procedure.
As a matter of practice, there are certain things I carry with me on the road in case of emergencies. In addition to a full array of spare fuses, jumper cables, ATF, a quart of oil, and a universal tool kit, I also carry spare accessory belts and a spare DME relay (actually a used relay which I repaired). Since most people don't have a spare DME relay lying around, I recommend carrying an emergency jumper.
Tools
2 wire leads with female spade connectors on one end (for testing)
3 lead "emergency" jumper with male spade connectors on each of the three leads (emergencies and testing)
Multimeter (for testing relay)
12 VDC power supply (for testing relay)
Magnifying Glass (for repairing relay)
Soldering Iron and Solder (for repairing relay)
Testing
Schematic of the DME Relay:
If a multimeter is unavailable, the Emergency Repairs section below can be used to test the DME relay.
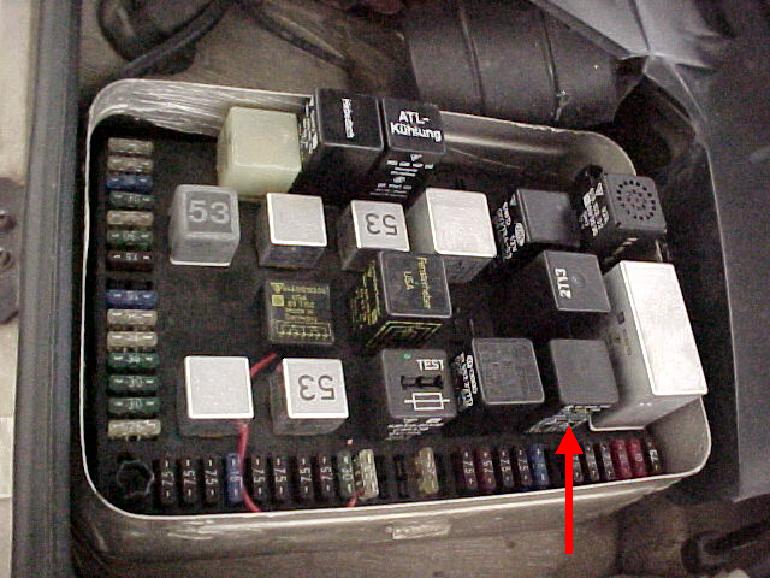
On the relay / fuse panel under the hood, remove the DME relay (G5).
DME Relay Location
Using the multimeter set to read resistance / ohms, take resistance readings across the following relay terminals (labeled on the bottom of the relay):
30 and 87b
30 and 87
The resistance across both sets of relays should be infinite. On a digital multimeter, this will normally be indicated by a "1." or "OL".
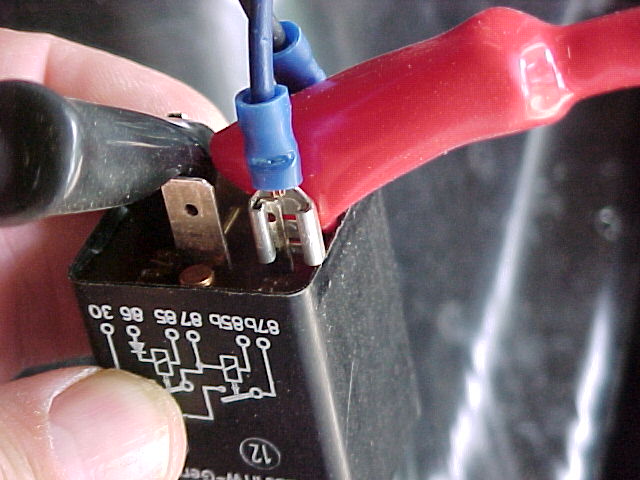
Connect a 12 VDC power supply across terminals 85b and 87 of the relay. Using the multimeter, take a resistance reading across terminals 30 and 87b. The resistance reading should be very close to zero (actually between 0.1 and 0.3 ohms).
DME Test
Connect a 12 VDC power supply across terminals 85 and 86 of the relay. Because of the diode in the circuit, you must connect the negative lead to terminal 85 and the positive lead to terminal 86. Otherwise, the relay will not pick up. Using the multimeter, take a resistance reading across terminals 30 and 87. The resistance reading should be very close to zero (again between 0.1 and 0.3 ohms).
If any of the readings taken above are bad, the DME relay should be replaced or if possible repaired.
Emergency Repairs
If you suspect the DME relay is bad and you need to move the car, you may install do so by installing an "emergency" jumper across terminals 30, 87, and 87b on the relay / fuse panel. Some folks will tell you to jumper terminals 86, 87, and 87b instead. This allows you to only run the fuel pump, DME, and injectors when the ignition switch is turned on. Seems like a great idea on the surface. However, realize that the wire supplying power from the ignition switch to terminal 86 on the DME relay is a 1.0 mm wire and is only intended to carry enough current to pickup the primary coil on the relay. The wire connected to terminal 30 is a 4.0 mm wire which is designed to carry full current demanded by the fuel pump, DME, and fuel injectors. I strongly recommend using terminal 30 instead of terminal 86 to supply power via the jumper.
The emergency jumper consists of three leads with male spade connector on each lead (shown below).
Emergency Jumper
To start the car using the emergency jumper, install the jumper in the following sequence:
Install one spade connector into terminal 87.
Install the second spade connector into terminal 87b.
Install the last spade connector into terminal 30. When the connector is installed into terminal 30 you should hear the fuel pump energize. The car can then be started using the ignition switch.
Alternative Emergency Jumper - Tech Tip from Ben Davis
" I got stalled on the side of the road, and didn't have a backup DME relay, or any wire, so I wrapped a paperclip around the right posts, and stuck the relay back in and it worked like a charm and got me home."
Jumpering these terminals and starting the car may also be used as an indirect method of testing the DME relay if a multimeter is unavailable. In other words, if the car will not start and you suspect the DME relay, install the emergency jumper and attempt to start the car. If it starts normally, it's very likely that the DME relay is bad.
Again, when the car is not running, be sure to REMOVE the jumpers.
Inspecting / Repairing the DME Relay
Remove the cover for the DME relay. Looking at the bottom of the relay, you'll see to tabs that hold the plastic cover onto the bottom of the relay. Pull outward on the bottom lip of the cover and pull upward on the terminals on that side until the bottom of the relay is clear of the tab. Repeat for the other side and the cover will come off of the relay.
Carefully inspect all solder joints inside the relay for cracks.
Back of DME Relay
Repair any cracked solder joints. It is often difficult to tell a bad solder joint. And, since I've never really been impressed with the soldering work on any of the DME relays I've seen, I usually resolder all the joints.
As a precaution, I normally replace the diode for the primary relay as well.
Front of DME Relay
After relay is repaired, install cover and test relay using testing procedure listed above.